|
room on your HD but think of them as digital
negatives. Shooting in Large JPEG mode is like throwing the
negative away and keeping the print. RAW files are simply
better and provide more options in post-production.The smaller
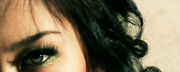
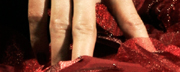
image (p.54) shows the original shot with a 1/3 exposure adjustments
made in the RAW utility. The photo session with April lasted
two hours and we shot three different scenes. Many of the
images were good but a handful turned out great and post-production
made them dramatic. I'm especially happy with the two examples
displayed here. Finally, to complete what I had envisioned,
each image (p.55 and p.58) took two hours of work in Photoshop.
Digital editing, if done well, can make your
image outstanding. Adding drama and depth can be simple in
some cases but in other cases it can be more time consuming.
The process used here illustrates the latter. My Post production
work is normally done on a per-image bases; if it comes from
the same set though I will use Actions in Photoshop to help
with the process but automated processes won't help much on
areas that needs special attention. You have to get in and
use Tools and the ones I use most in Photoshop are the Brush
Tool, Dodge, Burn, and Sponge Tool, Clone Stamp, Healing Brush
and Patch Tool and Blur, Sharpen and Smudge Tool. It depends
on the image but in some instances, I can use all of the above
mentioned Tools during the editing process. In other cases
I might use two or three of the Tools to help bring a dramatic
look to the image. One comment I have though is that if you
want the most from your tools (whether it's Photoshop, Painter,
etc..) I would strongly suggest using a Wacom tablet.
My process always begins with a rename and
save of the image to be worked. I usually keep the original
file name but add edt (edit) as part of my naming convention,
this denotes my first version. Additional version that I might
save include v2, v3, v4 (version) and so on. If I happen to
make a mistake along the way or the computer crashes, I've
saved versions that I like and can get back to a reasonable
starting point. If I haven't saved, I could lose two or three
hours of work and that's not fun. I then create a new layer
by dragging the Background to the New Layer icon in the Layers
palette; the new layer becomes my base image. Once that's
done it's off to work. For instance, I may use multiple layers
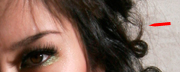
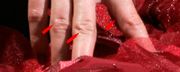
in working an image. I created the new wisp of hair (below)
by first selecting the area I wanted to correct with the Marquee
Tool then cut and past to a new layer. I used the Clone Stamp
and Brush to remove or add what I liked. After completing
the edit, I merged the layer with the base image and blended.
Depending on the project I may leave layers instead of merging
–I have some projects with 50 or more layers. |