The Skinny
The making of a ring light
|
I love playing with gadgets and contraptions.
Apart from creating images, this is the things that draws me
to photography, the wizardry, the cool stuff, chemicals (yes
I still have a darkroom and still shoot film), digital technology
and the endless magic of creating images. Go to any Pro camera
store and you will see what I'm talking about, there's practically
no end to the stuff you could purchase. The endless items and
contraptions to make your subject look
better, provide that element that helps your image pop, or give
|
|
|
you that edge over
your fellow photographers. Even if it is just to say I've got
the latest, greatest. Whatever, you don't need it. Those words
might come back to bit me when I want to buy that must have
piece of gear. I have to admit, I would like to have the latest
equipment and best of everything but making something that works
and understanding what makes it unique is even better. In the
studio, I am constantly challenged to come up with new looks.
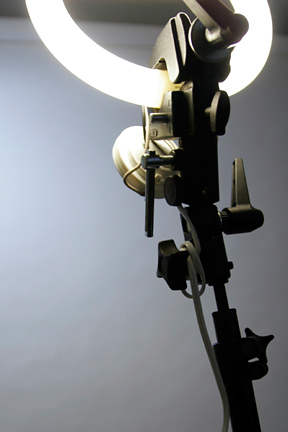
Keeping an open mind and being creative helps. The ring light
pictured at left is a great example of this. Several weekends
back I was changing out lighting fixtures in my home; one of
the fixtures to go was my kitchen light. We had this old florescent
tube-light and its days of use were at an end, or so I thought.
You have to know that I'm a bit of a pack rat but more so I
hate seeing somewhat useful items go in the trash. So, after
removing the florescent fixture and installing the new light,
I started think of ways to give the old fixture a new life.
I had already played around with a couple of other ring light
options over the past year and thought this old fixture could
make a great project. I set myself to the task of taking the
thing apart to see what elements I had to work with. The first
thing to go was the housing, it was really just to big and useless
but I needed some pieces from it. I'm not going to give a detailed
instruction here as I wouldn't want anyone to get shocked or
burn down their home. My whole point in explaining this is to
illustrate that there are many options which work wonderfully
and do not cost a gazillion dollars. However, it can sometimes
be a little hazardous but I'm the adventures type. I actually
have several lights I've put together from items purchased at
Home Depot and IKEA so this project wasn't going to be difficult.
I decided to test the theory first. I took the basic elements
from the light and did a rough wiring and rigging on the workbench
to see if it was feasible. After about 15 minutes, success!
At least enough to know I was going to commit to an hour or
so of making it safe. I broke out the Dremel and started cutting
on the plastic housing, I needed to free an enclosure for the
electronics. Once that was taken care of, I pieced the elements
together, wired the light and plugged it in. It worked. The
only issue now was getting it mounted securely and then getting
someone in front to test it out. I pulled out one of my Bogen
clamps, clamped it gently around a plastic cuff on the florescent
tube and then mounted it to the light stand. Amy came in and
was curious as to what I had been playing around with for the
last hour. I broke out the camera and snapped several shots
(below). After doing the test shots with |

|